Pages

Thursday, August 27, 2015

Communicating With Parents The Easy Way

Communicate with parents the easy way, with SimplyCircle


What are you using to communicate with parents this school year? Still using regular email or flyers? I wanted to let you know about a great service called SimplyCircle that makes communicating with parents much easier. Not only does it save you time, but it turns a chore (like reminding parents of an upcoming field trip so that nobody forgets to sign that permission slip or wear their school T-shirt) into something that is fun and easy to do. 

Plus, I love the look-and-feel of their newly redesigned app. As you all know, I’m a huge fan of Apple, and their simple and beautiful design. The new look of the SimplyCircle app reminds me of an  Apple-like design: clean, simple, and easy to understand. 

What’s SimplyCircle?


SimplyCircle is a website where you can create a free, private circle for your classroom. Just add all your parents to a circle, and then you can send them messages, events, tasks, photos, documents – basically anything you want. You can communicate with all the parents at once, or one-on-one. The service can be accessed from any computer, tablet or mobile phone – all you need is an Internet connection. And they just released their brand-new apps for both iPhone and Android.


Why do I like SimplyCircle better than regular email and paper flyers?
 

SimplyCircle is better for lots of reasons:

·         Saves you time. Instead of having to send parents multiple emails reminding them about the project that is due next week, you can set up a task with a due date, and SimplyCircle will remind them automatically. Parents can even add the task to their personal calendar.

·         Keeps everything in one place. When you send a lot of emails, parents overlook or accidentally delete some of them. That means they either tell you that you never told them the info to begin with, or else they ask you to send them the same materials over and over again. With SimplyCircle, everything is securely stored in one place, so parents always know where to go to find what they need.

·         Gets you more help in the classroom. One of the coolest features of SimplyCircle is the integrated volunteer signups. If you need help with something in the classroom, you can ask for parent volunteers easily, and they can sign up in just one click.

·         Helps you remember who’s who. When parents sign up for SimplyCircle, they’re encouraged to post a profile photo. These can be great at helping you remember who’s who, which is especially important at the beginning of the year, when there are so many new faces.

·         Great for on-the-go communication. SimplyCircle has always been mobile-friendly – no need to pinch-and-scroll. And now that they have native apps for both iPhone and Android, sending a quick update to the parents or sharing photos of the kids has never been easier.


How do you get started?


You can set up a free account and set up your classroom on SimplyCircle in just a few minutes. Then you can either invite all your parents via email (if you know their email addresses) or create a unique invite code that you can send home on a flyer.  The system is FREE, private and secure.

Good luck with your teacher-parent communication this year. And definitely check out SimplyCircle!
Give it a try and let me know what you think by leaving a comment. 


Wednesday, August 26, 2015

Chicka-Chicka Boom-Boom Welcome to my Classroom!

How I planned my day:


I was lucky to teach an Early Bird / Late Bird program where half of the students came to school at 8:00 AM and stayed until noon while the 2nd half came at 10:00 AM and stayed until 2:00.   

During the overlap time, we did our whole group calendar, literature, our special classes (like computer lab, science lab, library, P.E., and music), and one additional 25 minute activity which could be a followup activity to anything we were doing that week.

The Academic Block:

That was the time when I had only half of my class of 24. Having a group of 12 really allowed me to  teach efficiently to 3 groups of 4 students. It was a 2 hour block of time.

Whole Group Time:

We always started with a whole group intro to the day. Whatever I was going to teach during my small group time was introduced during my 25 min. whole group time. For instance, if I was teaching about the letter C, I might read the book Corduroy.  Then, I would introduce the independent table work and front load the students with any content they will need prior to their small group lesson. 

For example:  
(Remember, I was doing this with only 12 students and I might do only 1 of the following activities.)

~We might look at photos of things that begin with hard /C/.
~We might share our "mystery item" that we brought from home that begins with the hard sound /C/.
(Students give 3 clues about the item & the class guesses.)
~ We might brainstorm more words that begin with hard /C/. 
~We might use words that begin with /C/ to finish the sentence "I like ______." The teacher writes the sentence the child says and the child comes up to sign it.
~We might watch a quick video or Brain Pop Jr. about the letter C.
~We might watch one of Heidi's videos (from heidisongs.com) about the letter C.
~We might do a Close Reading Lesson.
~We might do a Smart Board lesson.
~We might write in our journals (and with only 12 students,  I could check each journal.)
and...
~I could teach the "signal word of the day" which might be: The teacher says, "C," and the students reply, "Says /c/ like Catina Cat," as they make a claw motion (Zoo Phonics style) with their hand. This signal word, and their reply, will signal the time for them to move to their tables to begin their independent work. 
Sample Whole Group Activities
After our whole group time, I would say the signal word, students responded with the proper reply, and they would move to their tables. That's when I would circulate to check for names on their work. I would rub a dot of scented lip balm on the top of their hand if they wrote their name neatly. Then I started calling groups for small group lessons. 

What Independent work might look like:

Students might find photos of things that begin with hard /c/ on their tables. They would choose 3 photos, draw a picture of each one on their paper, and label it. (The photos are labeled.)  Then, they might trace all of the uppercase and lowercase Cs on the dotted alliteration chant. 

You can do this on blank paper using pictures found in magazines or old workbooks or you can use the 26 templates and pictures included in my Picture Dictionary Set

You can find the dotted chants by clicking HERE.
Click the image to see the Picture Dictionary Set which includes all 26 letters and 3 pictures for each letter.
If they still haven't been called up to meet with me in a small group, they may go to any classroom center. (Centers were labeled with the maximum number of students who can play there at a time.) 
If you have a volunteer in your classroom, have them assist at the tables, supervise centers, and check work before students to to a center. 

What Small Group Lessons might look like:

Meeting with a small group.
I would call up 3 small groups to my horseshoe table during this 90 minute block. I would spend 20-25 minutes with each group. A sample small group lesson might look like this:
~Review the formation and sound for the letters C and c.
~Students are given a page with lots of pictures on it and a set of 10 Unifix cubes.
~Students place one cube on each picture that begins with hard /C/. When done, they count their cubes and link them together again.
~Students use dry-erase pens to trace and write the letters C and c on a laminated card.
~Students use a bingo marker (you can get these at The Dollar Store) to dot the letter C.
~Students use a push-pin to poke the dots on the letters C and c. Find the set by clicking HERE.
You would use all of these activities for one letter: "C"
When I was done teaching all 3 groups, I would help individual students. 


If you have a full-day class of 20-32 students (or a half-day class of 24 or more, you will have to modify and meet with larger groups at small-group time. Sign up 6th grade students to assist in your classroom during their recess time and try to get volunteers to help supervise students at independent and center time. 

How many students do you have and do they attend full-day or half-day K?

Monday, August 17, 2015

Classroom Management ~ The 12 inch whisper

What's a 12 Inch Whisper?


It's just like it sounds. It's a whisper that travels only 12 inches and it's perfect to teach students in ANY grade level.  This is how to introduce it to your students:

First, I say my name with a regular voice. Then, I whisper my name so everyone can hear it. 
I tell my students that there are big whispers and little whispers. During quiet work time, big whispers are better than voices, but the best whisper is a 12 inch whisper.


That's when I take out a 12 inch ruler. I tell them that I can make my whisper travel ONLY 12 INCHES!  I bring up 3 children and line them up in front of me. The first child should be 12 inches away from me. The 2nd child should be at least two steps behind the first child and the third child should be at least two steps behind the second child so they can't hear your 12 inch whisper. That's when I whisper something to the first child. I make sure the 2nd and 3rd child can't hear me. I ask the first child to tell the class what I said and I point out that the other children could not hear me.

Next, I ask the entire class to tell me their names all at once using a regular voice. I say, "1, 2, 3, tell me your name."  When they do, I jump back and cover my ears. I tell them that when everyone talks at once it hurts my ears! 

Then, I ask them to whisper their name to a partner and to make sure that their name only goes as far as their partner and not any farther.  "OK, 1, 2, 3, whisper your name to your partner now." After they all whisper their name at once, I smile and tell them that they are simply amazing! They were able to ALL communicate at once and it wasn't too loud and it didn't hurt my ears.

Have a few children come up and model saying their name to a partner using a 12 inch whisper. Then, send them to the tables to complete a simple assignment. Remind them that they may communicate as much as they want as long as it's a 12 inch whisper.  You circulate throughout the classroom praising the 12 inch whispers you observe students using and reminding the students who are using loud voices to use their 12 inch whisper. 


I also like to always carry a scented lip balm. If I observe appropriate behavior (in this case it would be the student using a 12 inch whisper) I apply a dot of scented lip balm on the top of their hand. They LOVE this! (I use this lip balm thing every day for simple things like writing your name on your paper or completing your work. I have them in all sorts of scents.)

Teaching students how to use a 12 inch whisper doesn't mean that your class will always be quiet. There are lots of times that you want students engaging in conversation, using regular voices, and practicing their oral language skills. It does mean that they now have an understanding of the concept of a 12 inch whisper and you can always remind them of this by saying, "12 inch whispers, please," whenever it gets too noisy.  I hope this helps! :)

Saturday, August 15, 2015

Snap, It's Almost September! ~~~~~~~~~~~~ But Look @ All The Deals!


Just in time for Back to School

My gift to all of you dedicated kindergarten teachers is my Back to School Bundle and it's on sale just in time for the beginning of the year!

There is so much happiness in over 60 pages in this  bundle! Just take a peek:

Click the image to grab this deal!

This bundle includes:
~Colorful certificates for the first day of kindergarten.
~A comforting note for parents to take as they leave their child at school on the first day.
~Our Letter-Name Book for recording the letters of each child's name.
~Our Daily Diary Book for recording the events of each day.
~Boomer's Take-Home Book.

You can read a more detailed description of the bundle further down this post, but first...
Click the image to go back to the Linky Party.


Here is a more detailed description of my Back to School Bundle: 


This bundle includes our First Day of Kindergarten Certificate. Print these colorful certificates, fill in each child’s name, sign, and date them and you’re ready to hand these out at the end of your first day. These will be a lasting keepsake for parents.  

You also get the cute 1st Day Parent Comfort Note that I send home with parents as they drop their child off at school.  

During the first 26 school days, we look for one letter each day in every child’s first name. We record these names in our 26 page Letter-Name Book. When the book is complete, we keep it in our classroom library so children and read and re-read it.  

At the end of each day, we complete one page in our Daily Dairy Book. The students dictate and the teacher records what we did each day. There is a colorful page for the cover of each month’s book and one black line master for each month. You will need to run off enough copies of each monthly page to match the number of school days in that month. Once each book is complete, you can send it home with one child at a time so they can share it with their family.  

Boomer is our class mascot. Each Friday, one child gets to take Boomer home for the weekend and write about their experience in our Boomer Book. All you need is a stuffed dog. Goes great with the story, Boomer Goes To School, by Constance W. McGeorge. 

This $19 value is usually offered for $15, but it's on SALE for $12 for just a few days. That's over 35% off of the original price of these items.  I hope you enjoy it. 


You won't want to miss any of the deals you will find at this linky party:


Click this image to see the Linky Party.


Wednesday, August 12, 2015

Managing Your TK/K ~ Part III: Small Groups


Differentiating With Small Groups:

While my kids are working on their independent table work, I call up small homogeneous groups of 4-6 students for small group lessons. I keep the same theme (ELA, math, science, or social studies concept), but I differentiate how I present it and what I expect the children to do. Here are some examples:
My Small Group Table. This is a photo of the students' work mats.
I just attached lined dry-erase contact paper to 2 of the mats.
They also have a number line and a set of alphabet letters and animals that begin with each sound. 

ELA:
TK: 
1st, students place a cube on each picture that begins with /J/(this allows me to use these pages year after year).
2nd, they trace the uppercase J and the lowercase J on laminated cards with a dry-erase pen. (Pens are easier to maneuver and they can erase the card and it's ready for the next student.)
3rd, they move to the carpet where they poke a hole in every dot of the dotted letter cards. (They get to take these home and hang them on a window to let the light shine through and illuminate each letter. )

Click the image to see the dotted alphabet cards.
K: 
1st, they place their cube on the /J/ pictures and brainstorm other words that begin with /J/ and try to write them on their dry-erase work mat.
2nd, they trace the uppercase J and the lowercase J on the laminated cards and evaluate their work by circling their best uppercase J and lowercase J.
3rd, they work together to create a group sentence using as many /J/ words as possible and we network as we all write that group sentence on our dry-erase work mat. 
OR... you can have each child complete the sentence: I like ________. The blank must begin with the sound of /j/.

More Differentiated ELA Lessons:

Instant Writing:
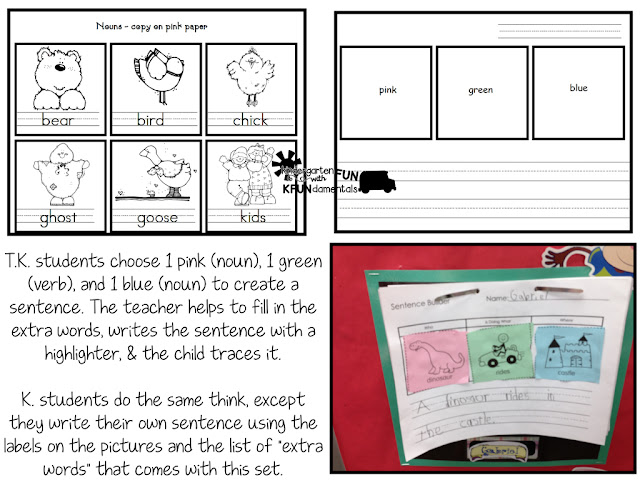
Students use the graphics, which are printed on colored paper, to compose a complete sentence. 
I also use a page of "extra words" such as "the, a, an, my, your, our, near, by, around, through, under, over, next to..." to help students complete their sentences.
Click the image above to see the entire Instant Writing set. https://www.teacherspayteachers.com/Product/Writing-Instant-Sentences-Perfect-for-beginning-writing--1116456

Writing About Colors:
These pages make great class books. The first one will have a page for each child's name.
The second one will show something that is the color mentioned on that page.
This set makes 12 wonderful class books.
Click the image above to see the entire Color Writing Pack.
It includes templates to create 12 books. 


Math:
TK:
1st,  Using my Number Pack, students complete the individual number page with help from the teacher.
2nd, then they create an object, using die-cut Pattern Blocks, to create an object that totals 3. (They may use all the same shape or 2 different shapes.) The goal is to match the pre-written number sentence which might be 2 + 1 = 3 or 3 + 0 = 3. The teacher is just introducing the pre-written equation as the students use the Pattern Blocks to create an object. I usually don't do this type of lesson until about Feb.
Click any of the images above to see the entire Number Pack.

Click any of the images above to see the entire Number Pack.

K: Using my Number Pack, students complete the individual number page independently. 
2nd, they create an object using the die-cut Pattern Blocks as above, except that the equation lines are blank and they have to decide which numbers to write on the lines to match the object they built. The students are building their academic vocabulary by using words like "plus" and “equal".

More Differentiated Math Lessons:

Rekenreks: 
These unique number racks have five white beads and five red beads which help your students to instantly see, or subitize, the numbers 6-10. They can easily make them using Fun Foam, pipe cleaners, and pony beads. 


Shopping:

What better way to apply math skills than through shopping?
I usually have 2-4 students do this activity with me at one time. While I let one student shop, the others watch so they are ready to shop when it's their turn. I set out all of the products, I create a menu with prices, I provide the money, an we collect the items purchased in a Zip-lock bag that has the child's name on it and a receipt. Once everyone has shopped, we create our monsters (or cats, see further below). These make a great bulletin board displayed along with each individual receipt.

Click the image above to see my shopping receipt set.
 Addition:

Students use manipulative to compose addition sentences. This can also be reversed to use with subtraction.
Click the image above to get the 1-10 number pack.
 Measurment:

Students measured, using cubes, they weighted, they estimated, and they talked about math!
This was a fun activity to do around St. Patrick's Day.

More or Less:

Students loved using Fun Foam letters to create "more" or "less" in each group.
They also enjoyed using the <, =, & > signs made from tongue depressors, google eyes, and Fun Foam for the teeth.
Click on the image above to see my More or Less set.

Tuesday, August 11, 2015

Making Your T.K./K. Combo Work- Part 2 Differentiating Independent Work

So What About The Table Work:

I get it. You have T.K. and K. kids sitting at the same tables. You want their independent work to be different and designed to help them meet the standards for their own individual grade level. 
During our 1 hr. 40 min. work time, students were required to complete an independent table task that should take the average T.K. or K. student about 40 minutes to complete. While they worked, I pulled students to meet with me in a small group setting for about 20-25 minutes.

 This left each student about 35-40 minutes to explore at the centers and play.


 Instead of setting the tables with their work, which took me about 20 minutes before school started, I introduced all of the work during whole group time and I set the papers out at the front of the room. I always placed the T.K. work to my left and the K work to my right. I watched to make sure that each child picked up the correct work. I would often have more advanced T.K. students pick up a page from the K side instead of the T.K. side and vice versa. That was just one more way to differentiate on an individualized basis. By setting the independent work out on the carpet each morning, I saved about twenty minutes each afternoon setting out the specific work for each child at their table. This was one more way I could work efficiently.

"So, what did the independent work look like and how was it different for each grade level?" you ask.
Typically on Mondays, T.K. students created an animal face that went along with our Zoo Phonics animals. (I have been asked numerous times to create these animal templates and post them on TpT and I promise it's on my list of things to do.) They might place the face in their letter portfolio (We made a portfolio for each letter that included a variety of projects that were all about that one letter.) or glue the face to a sentence strip and write an uppercase and lowercase letter to match the initial sound of the animal using a crayon. So, the 1st week we made a snake and the T.K. kids wrote Ss on the sentence strip each side of the snake's face.

This is a portfolio for the letter C.
Each pocket-page holds all of the "C" projects.
You can bind them into a book with yarn or staple them into 4 books of 6-7 pgs. each.
My K kids got to make a different snake that was a bit more complicated to cut out and assemble. They wrote with a pencil on their sentence strip: I see a (and that's where they glued their snake on) and added a period after the snake so it said: "I see a snake. Both groups got to wear their snake hats home or place them in their letter portfolio.

Here is the Alpha Chant for Hh.  It was more of a visual perception and letter recognition activity than a fine motor activity.
Click the chant to see this set in my TpT store. 
The beauty of this plan is that you can have your lowest K kids (the ones who can't write the phrase) just write Ss by their snake. They might still make the more challenging snake.

Likewise, you can let your T.K. kids who are ready to write try their hand at writing the sentence that  ends with their snake. You can differentiate this any way you like. The student who can write, but can't cut well might be given the easier snake. Your cutting expert who can't recognize one letter might be given the more difficult snake and less writing. Remember, this is independent work, not part of a small group lesson.

This is how I differentiated with my Phonics Picture Cards and Dictionary Pages:
Using picture cards that all begin with /C/,  all students draw 3 pictures of objects that begin with /C/ on their Phonics Dictionary Page and have your T.K. students label each picture with "Cc" while K students label each picture with the word. The Phonics Picture Cards and Dictionary Pages include 3 pictures for each letter of the alphabet. You can also just have student illustrate on a large piece of newsprint that is blank at the top (for pictures) and lined at the bottom (for initial sound letters or labels).
Click the image to see the entire set.

Each week, I would look at all of the activities I had for ELA, Math, Science, and Social Studies and I would sort them into TK and K levels.

Then, I placed them into my M-F file folders which I kept in a dish rack at the front of the room. It was easy to open the file, explain the work, set it out on the carpet, and watch as students picked up their work and took it to their tables.


More differentiated independent work:

Chick-a-chick-a-boom-boom trees:
TK: They made a Chick-a-chick-a-boom-boom palm tree by adding the palm treetop to a TP tube. We cut 2 slits into the treetop and slid it onto the tube. Then, they added the letters in their name which were printed in rectangles for them. The letters did not have to be in the correct order.

K: They had to cut out the treetop and the trunk, they drew crosshatched lines on the trunk, and glued their name to the tree. They had more cutting and the letters had to be in the correct order.


Day 100 Capes:
TK: They made a Zero Cape for Day 100 with a giant zero on the back and a 100 day necklace badge.

K: They made the same cape, but we added all of the 10s from 10-100 on stars. They also made 100 day glasses and a crown.


I like to keep the independent table work similar, yet different so all students might be working on the same letter, number, sight word, or science concept, but they will be doing different things with it. 

I hope these ideas help. Let me know how YOU differentiate independent work for your students.
Tomorrow I will write about differentiating small group lessons. 


Saturday, August 8, 2015

No Time For Science?

Back To School With Science:

I want to share some deals that will help you to easily include science in your busy school day.
I'll continue with my look at TK/K combos tomorrow. Promise :)

Check out these science experiments, science freebies, and science books that will make back-to-school fun for everyone. Science Projects - Educents Blog

Magic School Bus Polymer Group Pack

Seat belts everyone! Get ready to grow amazing polymers! Young Scientists grow super balls, snow, rainbow beads, crystal gels, and polymer flowers while learning about the importance and science of super-absorbent polymers. This kit provides enough materials for 30 students and is great for the classroom, after-school programs, science enrichment, boys and girls scouts, camps, and a Magic School Bus birthday Party!
 

FREE - Osmosis: The Colorful Celery Experiment

Celery Experiment - Educents Blog Are you teaching your students about osmosis? Perhaps it is a part of your science curriculum, or maybe you want to just do a little experimenting... The Colorful Celery Experiment is the perfect introduction to Osmosis. Your students will learn how water moves with this fun experiment.
 

Science Story eBooks - 50% OFF

BRIANIACSFollow Merrin and Pearl to combine science with adventure in Brainiacs. Also learn about the nervous, digestive, immune, skeletal and circulatory system with a five part series from Human Body Detectives eBooks.

Magic School Bus Inspired Planet Study - 30% OFF

Plan games, worksheets, and coloring pages to expand your young astronomer's understanding of space! Planets  
 

More Science Resources

Looking for more inspiration for science experiments? Check out these resources:

Friday, August 7, 2015

Making the TK/K Combo Work

Meeting Students' Needs In A Combo Class:


I have been asked by several people to blog about how I managed my TK/K combination class, but I think that many of these tips can apply to most combination classes.  I have just retired after teaching for 37 years, mostly K. I present at Pre-K and K conferences nationally and have taught many combination classes over the years.

If you are unfamiliar with T.K., you can read about it HERE

My Combo Classes:

I taught a TK/K combo for the last two years. One year I had 32 students and last year I had 24.
Both groups participated in the Early Bird/Late Bird program. That's when 1/2 of the group comes to school early (8:00 AM) and is dismissed at noon. The 2nd group comes in at 10:00 AM and is dismissed at 2:00. The overlap time was 2 hours, but only 90 minutes of that was class time. The rest was lunch. Both classes had a mixed Early Bird group of TK and K students with only TK students in the Late Bird group.

Today, I will talk about my class schedule:

Our Schedule:

8:00      Welcome Chit-Chat, intro the day's theme with a story & introduced the independent work for both TK and K. They would also complete a journal entry which could range from copying a short sentence to eventually writing their own sentence. (Yes, even most of the TK kids!)
8:20      Students move to their independent, heterogeneous tables groups where the T.K. and K. students each have their own special work.  I'll blog about lesson content tomorrow.

Students work on their independent table work in heterogeneous groups.
During the first week, instead of going to a center when your work was completed, the students played with the center materials placed on their tables. This group has books to read after making their 1st Day Hats.

Once students are settled at the tables, I begin meeting with small homogeneous groups. 
Mondays & Wednesdays were reading lessons.
Tuesdays & Thursdays were math lessons.
 Fridays were writing lessons. 
As I pulled 4-6 students for small group lessons, it left very few students at the tables. 
(Class of 32 had 5 tables of 6-7. Class of 24 had 4 tables of 6.)

Small group lesson with a homogeneous group.This was my aide who was credentialed, so she was leading this lesson.

Reading lessons ranged from Close Reading to informational text
 in content areas such as Science or Social Studies.  
Math lessons ranged from hands-on math activities 
such as making individual Rekenreks to completing our Math Journals. 
Writing was usually integrated with Science or Social Studies 
and could include a short experiment. 

Here is an example of a hands-on math lesson. I gave the kids a handful of Fun Foam letters. They glued two hands on the page and then letters to make the statements true. Click the image to grab my More or Less template. 

This is the perfect time to differentiate your lessons for T.K. and K. students. I will blog more about that tomorrow.

For a class of 32, I met with 5 groups for 20 min each.
For a class of 24, I met with 4 groups for 20 min each and then I spent 10 min meeting with
individual students. This is the perfect time for me to do a little one-on-one testing with individual students. I used ESGI to test my students because it's super easy, it provided me with so much data, and my kids begged to be tested!
This sample screen shot shows me the % of students who have mastered each test.
You can also view the data for each student. 

If I click on the gray bar, a list of students who have not mastered each skill pops up.Instant RTI groups for my intervention!
 You can get a 60 day FREE trial.
Use my code: B2174 
and you will save $40 off of your 1st year.
And... you can download my T.K. assessments
and try them out with your students.
Learn more by checking out their videos.


While I meet with small groups, students work on their 
independent table work and when they are done, 
they may go to a free-choice center.


Provide a lot of free exploration at your centers. K students need this too.

If you have an aide or parent volunteers, they can supervise and assist at the tables.

10:00      Recess
Provide lots of opportunities to develop large muscles.

10:15      Whole group calendar lesson, literature, one 30 min whole group lesson and one "special" 30-40 min class such as music class, computer lab, science lab, library, or PE.

Our music class.

Our Computer Lab.

Our Science Lab.

Visiting the school library.


The 30 min whole group lesson might be a craft project that goes with a letter, number,
or a science or social studies theme. It could be a whole group
"give me a sentence using this sight word" lesson,
we could practice letters, numbers, or sight words
with a variety of resources such as Heidi's Songs,
or we could take a brain break with GoNoodle.com.
I'll blog about lessons tomorrow.

32 Little Learners on Halloween during Whole Group Time.
11:30     lunch

12:00     Repeat all of the pre-recess activities from above. 

2:00      Late Bird dismissal.

If you have an aide, you can set up Intervention Zip Lock bags labeled with each child's name.
Inside the bags I placed little cards that had 1 skill on each card, such as "Name the letter 'a'." My aide was given tons of resources, such as Wiki Sticks, paint brushes & water, lined dry-erase boards, counting chips, etc. to practice the skills on the cards.

Tomorrow...

I will continue my post about managing a TK/K combination class and I'll talk more about differentiating your lessons to meet the needs of all of your students. So drop by this weekend to see part 2 of "Making the TK/K Combo Work"

Let me know if you are teaching (or have taught) a combination class.